I’ve passed in the second evaluation of Google Summer of Code 2018. I am ready for the third phase, but before that I’ll give some updates about how my progress with RAID on kpmcore is going. This post will explain how RAID management works on Linux.
Linux and RAID devices
First of all, you must know which types of RAID exist in Linux. I am not talking about RAID levels (i.e.: 0 [striping], 1 [mirroring], 4, 5, 6 and 10…), I explained a little bit about it in my GSoC proposal. So what I am talking in this case is about two different tools used by Linux to manage two different types of RAID identified by the kernel, which are:
- Fake RAID (ATA RAID, managed by dmraid tool).
- Software RAID (MD RAID, managed by mdadm tool).
Fake RAID (ATA RAID)
Fake RAID devices are set up by a hardware RAID controller, which are detected by device-mapper. The device-mapper is a component of the Linux kernel. It allows the Linux to do all the block device management. dmraid uses libdevmapper and the device-mapper kernel driver to manage this specific type of RAID, including the process of discovering, configuring and activating ATA RAID devices. You can see below the types of RAID arrays supported by dmraid:
asr     : Adaptec HostRAID ASR (0,1,10)
ddf1    : SNIA DDF1 (0,1,4,5,linear)
hpt37x  : Highpoint HPT37X (S,0,1,10,01)
hpt45x  : Highpoint HPT45X (S,0,1,10)
isw     : Intel Software RAID (0,1,5,01)
jmicron : JMicron ATARAID (S,0,1)
lsi     : LSI Logic MegaRAID (0,1,10)
nvidia  : NVidia RAID (S,0,1,10,5)
pdc     : Promise FastTrack (S,0,1,10)
sil     : Silicon Image(tm) Medley(tm) (0,1,10)
via     : VIA Software RAID (S,0,1,10)
dos     : DOS partitions on SW RAIDs
Software RAID (MD RAID)
Software RAID devices are managed by mdadm. The device-mapper is not aware of the RAID arrays created with mdadm tool. It supports the following RAID levels: 0, 1, 4, 5, 6, and 10. Below you can see mdadm operation modes (as descripted by its manpage):
Assemble the components of a previously created array into an active array. Components can be explicitly given or can be searched for. mdadm checks that the components do form a bona fide array, and can, on request, fiddle superblock information so as to assemble a faulty array.
Build an array that doesn’t have per-device metadata (superblocks). For these sorts of arrays, mdadm cannot differentiate between initial creation and subsequent assembly of an array. It also cannot perform any checks that appropriate components have been requested. Because of this, the Build mode should only be used together with a complete understanding of what you are doing.
Create a new array with per-device metadata (superblocks). Appropriate metadata is written to each device, and then the array comprising those devices is activated. A ‘resync’ process is started to make sure that the array is consistent (e.g. both sides of a mirror contain the same data) but the content of the device is left otherwise untouched. The array can be used as soon as it has been created. There is no need to wait for the initial resync to finish.
Monitor one or more md devices and act on any state changes. This is only meaningful for RAID1, 4, 5, 6, 10 or multipath arrays, as only these have interesting state. RAID0 or Linear never have missing, spare, or failed drives, so there is nothing to monitor.
Grow (or shrink) an array, or otherwise reshape it in some way. Currently supported growth options including changing the active size of component devices and changing the number of active devices in Linear and RAID levels 0/1/4/5/6, changing the RAID level between 0, 1, 5, and 6, and between 0 and 10, changing the chunk size and layout for RAID 0,4,5,6,10 as well as adding or removing a write-intent bitmap.
Add a single device to an appropriate array. If the addition of the device makes the array runnable, the array will be started. This provides a convenient interface to a hot-plug system. As each device is detected, mdadm has a chance to include it in some array as appropriate. Optionally, when the –fail flag is passed in we will remove the device from any active array instead of adding it.
This is for doing things to specific components of an array such as adding new spares and removing faulty devices.
This is an ‘everything else’ mode that supports operations on active arrays, operations on component devices such as erasing old superblocks, and information gathering operations.
After creating your RAID arrays using mdadm tool, you can save your devices configuration in the file /etc/mdadm.conf (or /etc/mdadm/mdadm.conf, depending on your distro). You can use this file to reassemble your arrays and to make the kernel know which arrays should be loaded. Your loaded devices will be listed in /proc/mdstat.
Conclusion
This GSoC project will focus on the implementation of Software RAID devices manipulation by kpmcore, KDE Partition Manager and Calamares. kpmcore will communicate with mdadm to manipulate these devices. I’ve finished implementing the support to the visualization of SoftwareRAID by kpmcore and KPM, it now loads these devices and allows the user to manipulate its partitions.
For now, I am improving the code to be more stable and soon I’ll write a more detailed post about it. There is a group of commits related to it in kauth branch on both of kpmcore and partitionmanager repositories. Also I am testing how kpmcore deals with multiple RAID levels. There were some problems, such as the partition table loading and RAID partition name schemes when creating/removing them, but my mentors are helping me a lot with these issues.


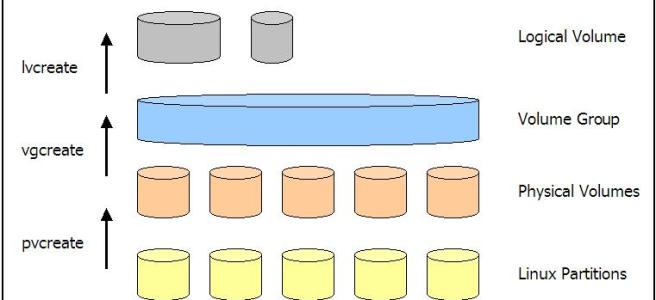
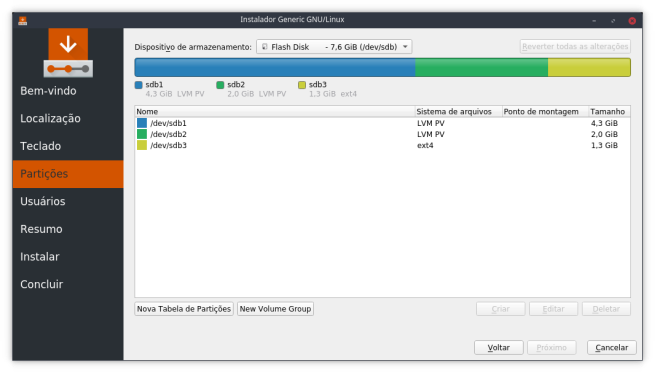 Image 1: Partition page in Calamares. Look the “New Volume Group” button.